This week I practiced drawing kawaii clothes. It’s actually not as hard as I thought, if you keep a few points in mind which I will share in this post.
I will also include examples of basic clothes for kawaii, such as shirts, pants and hats.
This is Week 17 of my drawing challenge to learn kawaii drawings in 6-months. You can see my weekly progress at this link.
Tips for Drawing Clothes for Kawaii Characters
Drawing clothes for kawaii is like dressing up a chubby doll. You have to visualise how the kawaii body fits underneath the layers.

Let’s start by looking at a kawaii body of a boy and a girl:
Boy and girl bodies are very similar in their construction. Both are plump and rounded, child-like. A few differences to notice are:
- Boys have slightly wider shoulders than girls.
- Girl bodies are more curvy. Look at how girl legs are a lot more shaped, where as boy legs are just straight.
- Boys’ stance is wider and firmer; girls’ stance is more elegant.
- Girls’ body is shaped like a pear, with a hint of a hip line. Boy’s body is more like a barrel, with no visible waist line.
Keep these points and shapes in mind when visualising and drawing the clothes. Think of the volume of the body underneath the clothes, imagine the clothes going around the body, hands, legs and head.
How to Draw Basic Kawaii Clothes
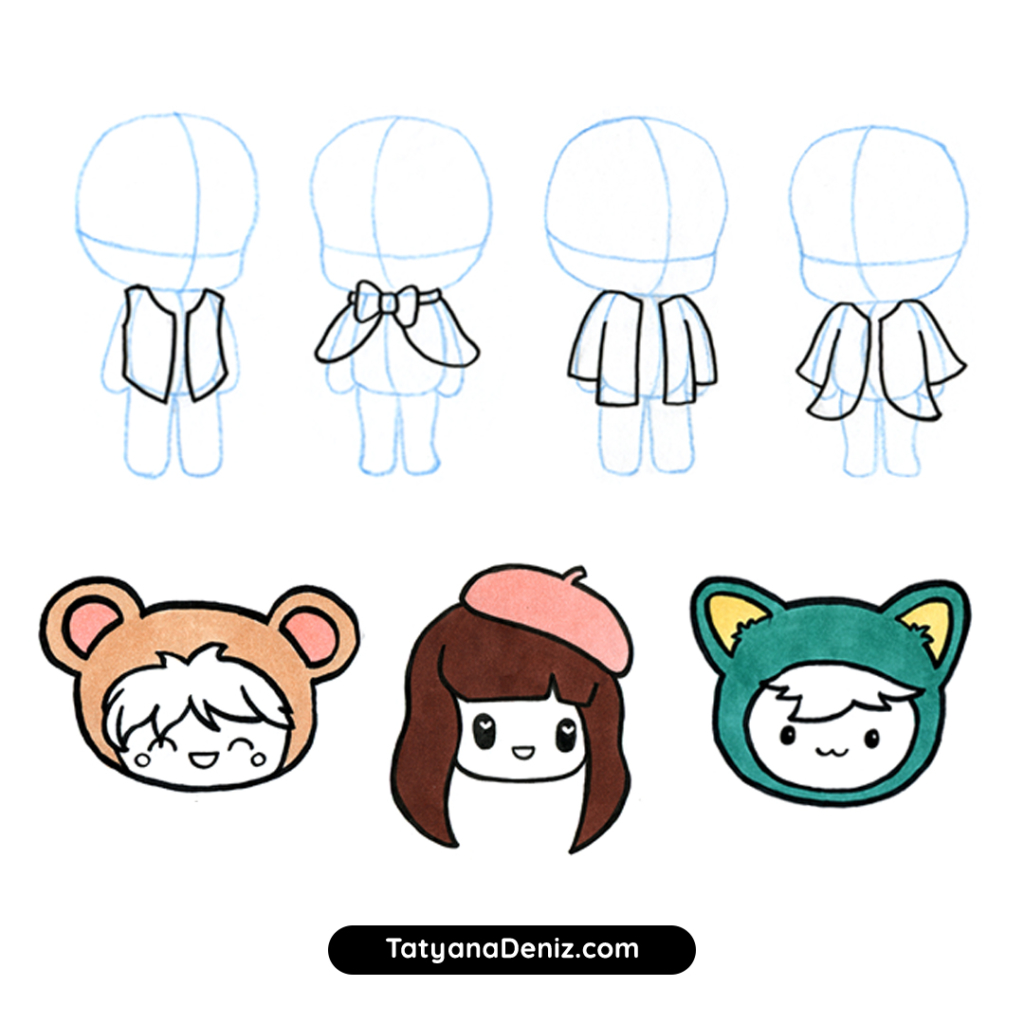
Now that we understand the kawaii bodies, let’s see how we can “dress” them up in basic skirts, pants, shirts and shoes. You can use these examples as starting points, and add your own design adjustments and embellishments.

I left the blue pencil lines poking through the clothes to show how the clothes really wrap around the body shape.
How to Draw Kawaii Hats & Anthro Hats
I made a separate section for kawaii hats, since I wanted to practice drawing heads with hair and faces defined. And I just wanted to have some fun 🙂
This is the first time I am using colour and Copic markers, and scanning in coloured drawings. This adds a new set of challenges! For example, colour intensity seem to fade during the digitising process, and it has to be brought back in post-production. This takes time. On the other hand, colour adds a whole new dimension to the impact of the drawing, so it’s well worth it.
Animal (Anthro) hats and Tokidoki Cactus hats

Below are a few examples of kawaii animal hats, also known as Anthro hats. Anthros are kawaii human characters in animal costumes, which makes them unbelievably cute!
I have included Tokidoki in the Anthro round up, since Tokidoki Cactus Friends are human characters dressed in plant costumes, rather than animal costumes. But the idea is the same.
Eight Ways to Draw Fun Kawaii Hats

Here are examples of fun ways to dress up your kawaii characters in hats. Most of the inspiration for these hats, and the animal hats above, comes from Chris Hart’s book Manga for the Beginner Kawaii. I will list it in the References section below.
How to Design a Complete Kawaii Character
Now, let’s put it all together. We’ve looked at a body of a human kawaii character, and how to draw the clothes on the body. We’ve also looked at a few hats and fun accessories.
Steps to design a human kawaii character
- Sketch the body (use example in the beginning of this post).
- Add a basic outfit to dress the character. To get ideas, use examples of basic clothes and hats from this post.
- Decide on the theme for your character. Is she/he sweet, anthro, goth or something else?
- Add decorations to the clothes that go with the theme.

Below is my version of this exercise. First, I show (again) a kawaii body. Then, kawaii body with clothes on it. I’ve left the blue lines visible to show the body construction and how the clothes fit around it. The third drawing shows the same two dressed characters, but with construction lines removed.
Materials I Used This Week
- Micron pens, black, brush and size 1
- Tombow Dual Brush pen, black
- Copic Ciao markers
- Prismacolor pencil, blue
- Bleedproof paper
- Tracing paper
- Mechanical pencil
- Faber-Castell dust-free eraser (my favourite!) and General’s Kneaded eraser
- Paper clips (to hold paper while tracing)
This week I needed a pen to produce a thick consistent line. The best solution I found is the Tombow Dual Brush pen (with the thicker brush side). The line is pretty good, but it takes a while to dry, so it’s prone to smudging.
Brush pens are good, but they do not produce a line of even width. Sharpies should be good, but they spread, even on bleedproof paper..
So I keep looking 🙂 If you know of a pen that would work, please let me know!!
Full disclosure: I personally own and use all of these. If you buy anything using my links, Amazon will pay me a small commission (no cost to you – thank you!). But if you normally shop somewhere else, it’s totally ok too.
References
- Manga for the Beginner Kawaii book by Chris Hart
- My earlier post about drawing circles
- Post on kawaii body shapes
- Post on how to draw kawaii hands and feet
Drawing Time Diary
Mon, March 6: 1 hr 40 mins
Tues, March 7: 45 mins, 1 hr
Wed, March 8: 45 mins, 1 hr
Thur, March 9: 30 mins
Fri, March 10: 45 mins
Sat, March 11: 3.5 hrs
Sun, March 12: 30 mins, 45 mins
Total drawing time: 11 hours 10 mins. Woo hoo!!! Biggest drawing week so far!
Does this post help you with your drawings? Please share it!
What’s next? Read all about my drawing challenge to learn kawaii drawings in 6-months, and track my progress week by week. Thank you for reading!
