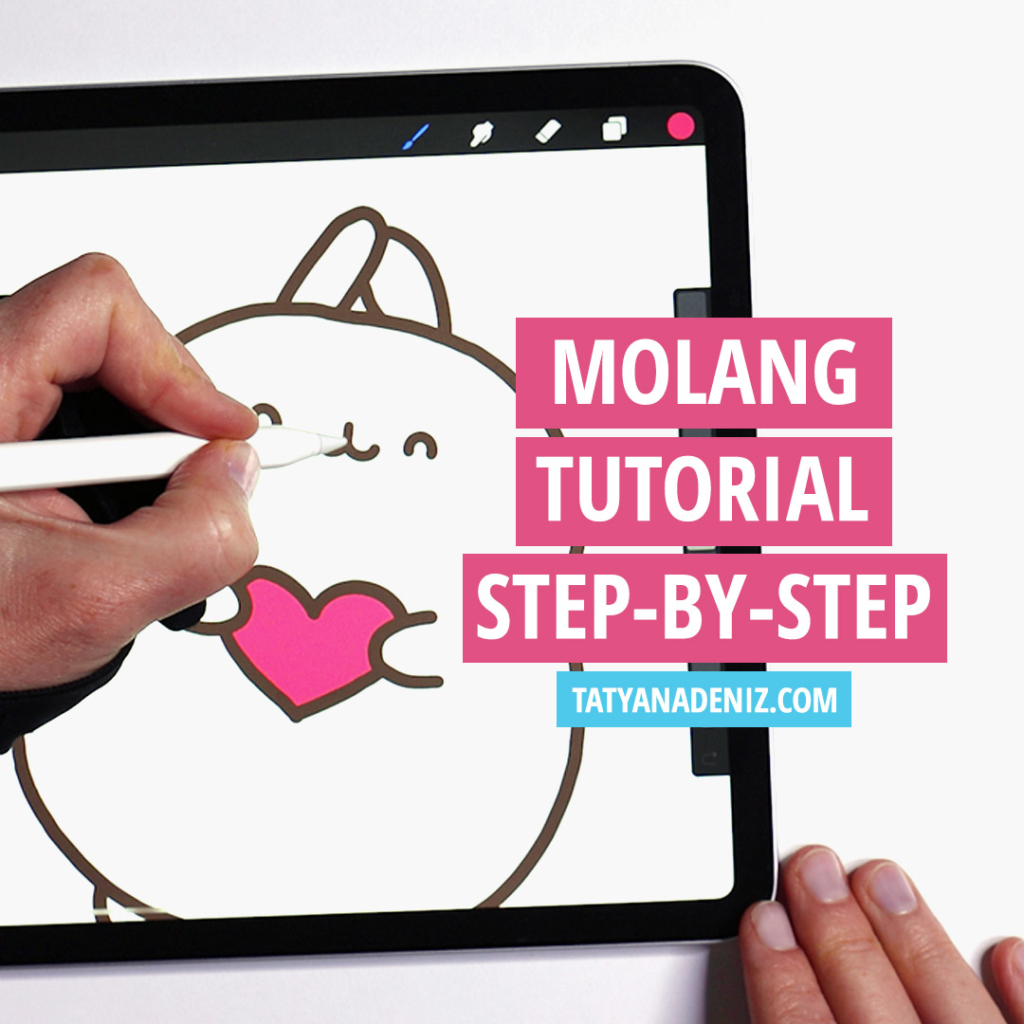
In this post, I’m going to show you how to draw Molang step-by-step. Molang is a very simple, cute, and adorable character that will show you all of the main features of a kawaii character.
Today’s tutorial is part 1 of a 2-part video series on how to draw Molang.
Who is Molang?
Molang was created by a South Korean artist Hye-Ji Yoon in 2010. Then in 2015, Molang became an animated TV series.
Molang is a bunny, and he has a friend called Piu Piu, a little chick. For today’s tutorial, we will focus on Molang so we don’t get distracted by all the details of adding Piu Piu. We will save Piu Piu for next week! 🙂
It is said that Molang character is based on a rice ball. And so many of the classic kawaii characters have this simple rounded oval shape as a base.
So let’s jump in and learn how to draw Molang.
And while we’re drawing, I will talk you through what makes it kawaii and how to apply the same principles to the characters you will draw in the future.
BONUS! Download my essential Procreate brushes for FREE!

I will be using Procreate for this demo, and I’ll be using the Derwent brush from the free sketching set that comes with Procreate.
If you are following along on paper, the process is exactly the same. Just use your pencil and eraser to adjust the lines.
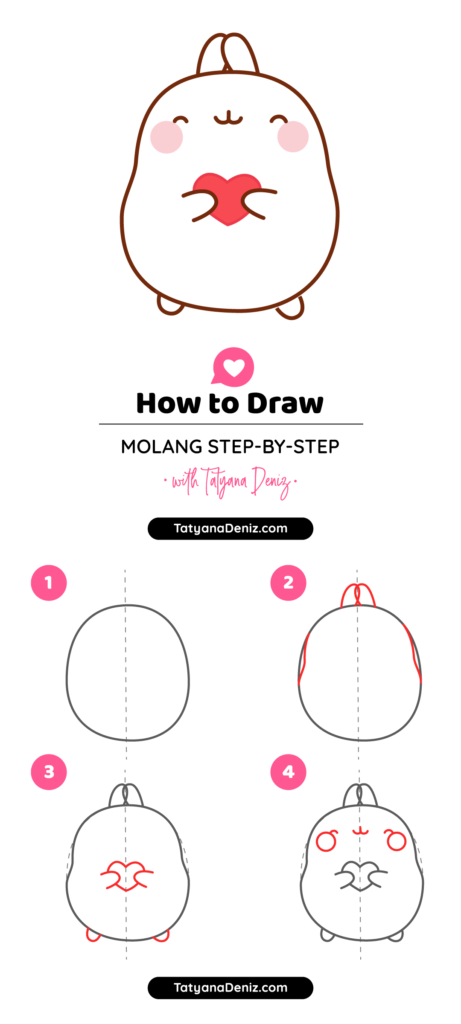
Step 1: Set Up Your Drawing Guide
I almost always start my drawings by creating a vertical guide to keep the character symmetrical.
If you’re using Procreate, you’ll create the guide on the first layer by drawing a vertical line.
Step 2: How to Draw Molang (The Foundation)
👉 CLICK HERE to Pin This Tutorial 👈
👉 CLICK HERE to Pin This Tutorial 👈
I’m going to start drawing Molang by drawing an egg shape on a separate layer, so that I can move it around.
Molang is a little bit more narrow at the top and a little bit fatter at the bottom. Now, if you’re using a pencil, get the shape just right by erasing a little bit and adding a little bit where you need it.
Before I start doing the full drawing, I want to make sure the body shape is solid and even. Starting with a good foundation will help us when finishing the drawing.
Remember, we’re drawing by hand, so the drawing doesn’t need to be perfect. 🙂 If you’re using vectors, you can always use the shapes that come on the computer if you want perfection. But drawing by hand gives it a bit of charm.
Molang is a based on a bunny. If you look at his body, the ears in proportion to his body are tiny. And I think that adds to the cuteness factor.
So in kawaii, you often have tiny hands and tiny feet compared to the body, and the ears are sort of folded and overlapping.
I draw an upside-down U-shape for one ear, and the second upside-down U-shape tucked away underneath the first one.
If you look at Molang, his head flows into his body. So to indicate this, we will create these little dimples on the side. It’s more like a pear shape. Once you have the first dimple, draw the same kind of dimple on the other side. Try to keep it matching, but it doesn’t have to be perfect.
Step 3: How to Draw Molang Features
Face
Let’s start with Molangs face. I’ve created a new layer to move things around without affecting the layers below it. And I’ve added a guide for where the face is going to go.
When you’re drawing kawaii characters, the face is usually tiny compared to the size of the body. So I might even decide to move it up once I finish, but let’s check it out.
In this image, Molang is happy and kind of smiling. To draw this, add 2 little arches to indicate squinting, happy eyes, and a little animal face. You should have a small vertical line for the mouth and 2 U-shapes for the eyes.
You can also add a stylized nose and big kawaii-style cheeks to make them adorable and blushing. We can then add some color.
Feet
Molang is standing on the ground. So let’s imagine where the ground is and where his feet will go.
Try to keep the feet more or less on the same angle. So if you imagine a clock, the angle the feet is at 5:00 PM and 7:00 PM.
Hands
Now, let’s do the hands. First, create a new layer. Now, I imagine the hands holding something. Let’s say, for this drawing, I’ll give Molang a little heart to hold.
To draw the hands, I’m going to draw a little U-shape on one side overlapping, and then draw a matching U-shape on the other side.
Erase out the overlapping area, and there’s Molang!
The Finishing Touches
Let’s outline Molang and add a little bit of color for the full effect. So I’ve got my outline on one layer, and then I’m going to make a new layer and put it below my outline. Now I’m going to give our Molang cheeks.
I’m going to add another layer for the heart. I want to make it red, but I don’t want to do it on the same layer as the cheeks in case I want to move things around.
Finally, let’s hide the sketch lines and guides, and we have our finished Molang drawing. 🙂
Bonus Tip
In this tutorial, Molang is holding a heart. But it doesn’t have to be a heart. You can put any object in his hands.
Kawaii characters have tiny hands and often hold giant objects, which adds to the story and humor of your drawing.
So you just draw 2 little arches, and just add your object between those arches with a slight overlap of the hands. It’s an easy way to make your drawing more interesting.
Next week I will show you how to draw Molang in perspective holding Piu Piu. It will be a great tutorial for beginners on how to draw in perspective.
Check out another drawing tutorial in Procreate on how to draw kawaii sushi. 😛
Join Our Facebook Group
Join our safe and friendly community on Facebook to share your kawaii art, get feedback, and connect with like-minded creatives. Create, share, and celebrate cuteness together!
Share the Love
If you found this Molang tutorial useful, please share it with your friends using the buttons below. You will make my day. 🙂
Thank you for drawing with me today, and I will see you in the next tutorial!