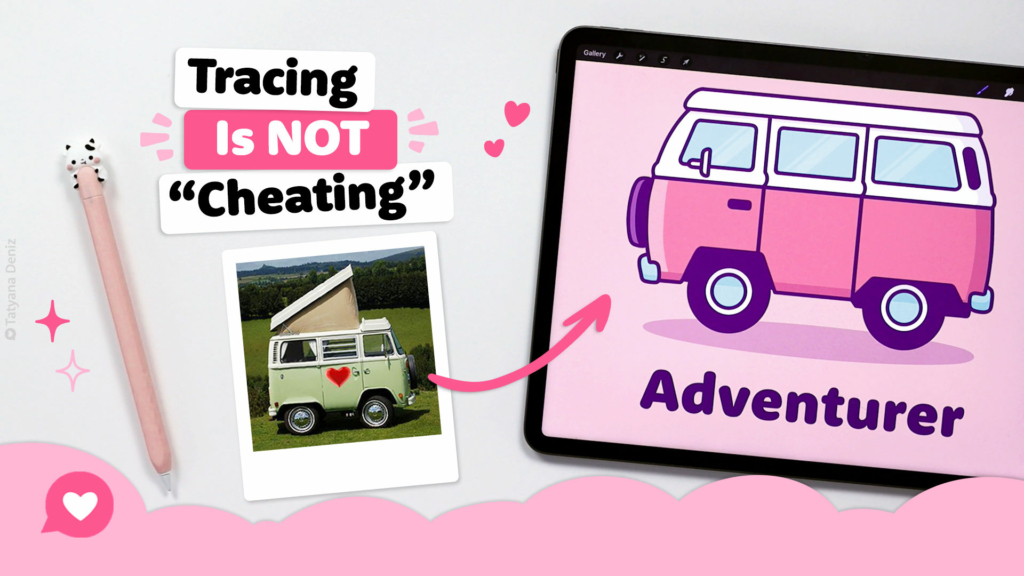
Tracing is NOT cheating! 😆 Procreate can be used to trace a photo and create a vector-style line drawing. Yes, it’s possible! It’s a tool that will open up a whole world of creativity to you.
In this tutorial, I will show you the complete step-by-step process of turning a photo into a vector-style line drawing in Procreate, and keeping your lines smooth and clean.
👉 CLICK HERE to Pin This Tutorial 👈

👉 CLICK HERE to Pin This Tutorial 👈
My Essential Settings for Drawing in Procreate
These settings are really helpful for any work you’re doing in Procreate. Let me start by showing you the five settings that I have on my iPad that save me hours every day these are essential settings for drawing. Under the wrench tool we’re going to go to preferences and then gesture controls. If you’ve ever made a mistake and couldn’t find which layer it was in, I’m going to show you how to prevent doing that. Go to layer select and enable the square+apple pencil, then if I press on the little square, back on my canvas and I tap with the apple pencil that is going to select the layer I want.

Next we’ll enable to quick menu. Click the wrench and choose preferences, then gesture controls and quick menu. From there you can choose the square+ whatever option you like.
Next isn’t a setting, it’s more of a tip. Swipe down on the canvas using three fingers to get an extra helpful menu. You can copy and paste or duplicate another layer among other useful things.
Finally, something that will be very useful for references is using split screen. Gently swipe up and grab Pinterest or your browser and drag it to the side. This will open it up while keeping Procreate open allowing you to find and use references easily.
Step 1: Create Line Art
The first thing we will do is import the image we want to use into Procreate. I have decided on a trailer but this will work with anything. It will be used as a starting point for our illustration we will not be completely copying it. Click the wrench tool and choose insert photo. Then reduce opacity so we can easily trace over top. Create a new layer and start the process. It is rough and doesn’t need to be perfect right now. We don’t want to draw every detail, we will take things and simplify them.

Remember to draw in big strokes to help you keep the minimal style we’re going for. During this stage I rarely use the undo button I just draw. If you want a straight line simply draw a line and hold. Procreate will turn it into a straight line if you put your finger on the screen it locks this line and you can get a perfectly straight line. If you want to make any changes to the original piece now is your time. Once done, it’s time to create line art.
Step 2: Refine Your Line Art
Before we start you may want to create a new layer for this step as well. Using the original image you’re going to refine the details of your art. Things like under the tires, or the rims of the tires. Do you want to draw 7 rings around the tires? Maybe but not when we are trying to make a simple kawaii drawing! Instead we will draw two. This still allows for the hub cap and another ring for added detail.

If you want to make any changes, now is the time. For example, if you don’t like the front windows you can change them to be one long window. Perhaps add a shadow to your
Step 3: Outline in Vector Style
Here is where we are going to take the sketch and turn it into line art. This is where we want to be really precise. I will be using my own custom “Monoline brush” for this. You can use any monoline brush or download my signature Procreate brushes for yourself.
I’m going to stick with the purple to give it a retro feel. You can choose to use any color you like.

First, create a new layer. Because we made the sketch so simplified you may want to make the original image smaller and place it in the corner for reference. You want to focus on keeping your lines smooth by using the Procreate tools, erasing using the same brush you are drawing with and redrawing lines. It takes a bit of patience but you will get there! Remember you want to create contrast with your line art as well, you can do this by filling some areas completely with your line art color.
This is an effective way as well, to hide areas that are very detailed, like the area above the tires.
Sept 4: Add Color to Your Line Drawing in Procreate
Kawaii is all about simplicity and cuteness, this includes the colors. Now, I’m going to use a limited color palette, I have a few in mind but will stick with a pastel very kawaii look. Block in your colors, and don’t forget to put each color on it’s own layer. This makes it easier to change the colors. If it doesn’t work you can simply go to that layer and change everything that has that color.

After blocking in your color you can leave it like this and call it done. Or you can add shadows. I will add some shadow to my piece.
PRO TIP! To create a nice shadow use the color of your line art. Lower the opacity to what works and you’ll have a great shadow!
Watch Next
If you enjoyed this tutorial, you will also love:
- Smooth Lines in Procreate
- Color Tools in Procreate
- How To Draw Kawaii Pun in Graffiti Style in Procreate
- Create YOUR OWN Kawaii Art with this ULTIMATE Character Design Tutorial
Join Our Facebook Group
Join our safe and friendly community on Facebook to share your kawaii art, get feedback, and connect with like-minded creatives. Create, share, and celebrate cuteness together!
Share the Love
If you enjoyed this tutorial, share it with your friends using the buttons below. 👇 Let’s co-create together! ❤️