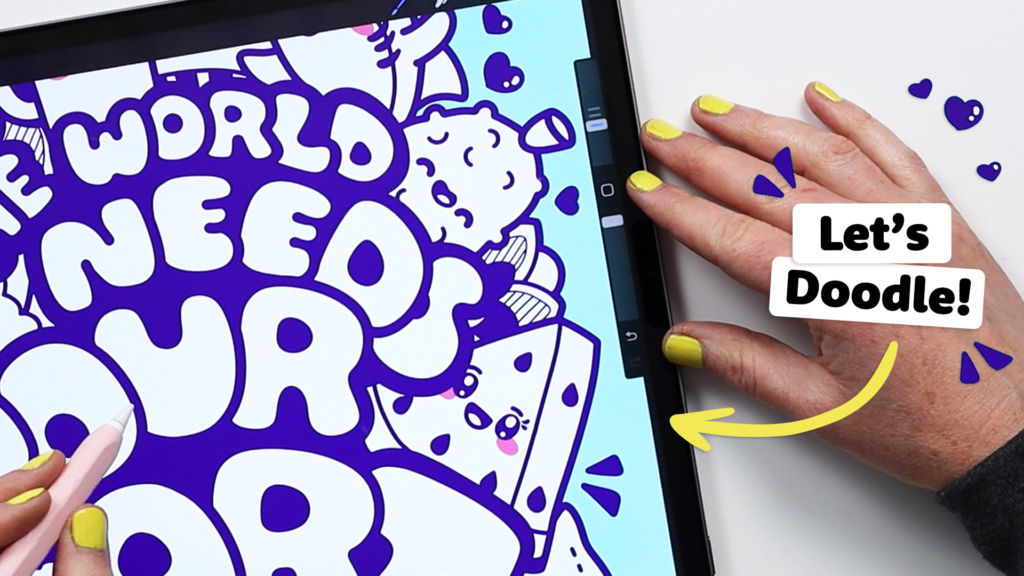
Let’s create a full page doodle in Procreate step-by-step. In this tutorial I show you ALL the steps: choosing characters, creating a layout, outlining, adding textures. I KNOW you will create something very cool with it.
👉 CLICK HERE to Pin This Drawing 👈

👉 CLICK HERE to Pin This Drawing 👈
Step 1: Set Up the Procreate Canvas
We begin our full page doodle in Procreate by opening the Procreate app and setting up a new canvas. For this project we will use a A3 size canvas, envisioning a large poster layout. To look at the canvas specifications, we access the wrench tool in the menu, select canvas, and review the canvas information. The canvas dimensions were configured as A3 with a print resolution of 300 DPI, meeting the minimum requirement.
We have the canvas in the right size, a vertical poster orientation, and we are now in front of the proverbial blank canvas. This project will incorporate text that reads “The world needs your art.” While drawing your own doodle, remember to think of the text as shapes and for the composition it will act as another character.

Incorporating text as shapes
We explored various text arrangements and sizes, eventually selecting a design where “your art” takes center stage. With this design in mind, we ventured into character design. We started with loose, freehand shapes and forms, fostering creativity without attachment to a specific outcome. These initial sketches provided a foundation for the chosen design, which we refined by adding shapes and details to enhance its visual appeal. The plan is to continue refining and developing this design in the upcoming steps.
Step 2: Select the Characters for Your Doodle
In this stage, remember that text is essentially a shape, and we already have our preferred sketch. To begin, I copied and pasted the sketch into a new file and outlined the shape of the text. While I didn’t finalize the text at this point, I arranged it and tested it by resizing it or even flipping it to make sure it maintains balance.
BONUS! Download my essential Procreate brushes for FREE!

Now, having our text layout for our full page doodle in Procreate, we need to introduce the actual characters. Although this isn’t a character design tutorial, it’s essential to maintain a cohesive theme. To streamline this process, I decided to use characters created by members of the Kawaii Drawing Club. I selected these characters from our recent ‘funny’ theme prompt, which promotes co-creation.

Tip! If you have any gaps, fill them with textures!
I’m not worrying about anything behind the text, that won’t be seen. But if you do see gaps you can fill them with decorative elements, or even textures.
These characters formed the foundation of our composition. The next step was to redraw them, ensuring consistency in style and ‘tatyanifying’ them slightly to maintain a uniform cohesive design. Finally, I organized decorative elements from these characters, such as shines and accent marks, for potential use in the layout.
With our characters ready, we can now proceed with the layout.
Step 3: Block Out the Big Shapes for Full Page Doodle in Procreate
All of the characters have been redrawn and placed on separate layers. We’ve already determined the text layout. The real challenge begins here as we work on creating the full-page doodle. We need to mold and shape these characters into a cohesive design.
We consider various factors while arranging the characters. For instance, we maintain a variety of shapes while ensuring overall balance. Rounded and pointy shapes guide our placement decisions.

When positioning characters, we think about their interactions. Elements in front should make physical sense, so we might flip characters horizontally to create better visual flow. We adjust their positions to lead the viewer’s eye into the composition instead of out of it.
Create visual balance
To create visual balance, we consider stacking order. Bigger elements usually go at the bottom, making the composition appear stable.
Now, let’s fill in the gaps and areas that still need characters. We can repeat decorative elements, such as a flower, to create cohesion in the composition.
This stage is critical, as the next step will be finalizing the layout, and any major changes would be challenging. We’ll remove the initial sketch and adjust the background color for clarity and contrast, making it easier to evaluate the composition.
Step 4: Outline All the Characters to Bring This Full Page Doodle to Life!
This stage can be quite lengthy and meticulous. Our task here is to go through the composition and outline all the characters. I won’t take you through this entire process, but I’ll share some essential tips.
When outlining, it’s crucial to consider the thickness of the lines. For this drawing, I used my smooth outline brush. I set up three line widths: 27%, 20%, and 12%.
Before outlining, it’s a good idea to add a layer of white in front of the entire picture. Reduce the opacity of this layer to make it semi-transparent, allowing you to see your sketch without it being too distracting.

Now, let’s pick a color for the outlines, which can be purple, black, or any color you prefer. For the main elements, such as text, I usually choose the thickest outline (e.g., 27%). It’s essential to maintain consistency in the line thickness throughout the drawing.
However, for smaller details, like the insides of certain characters, you may want to use a thinner outline (e.g., 20% or 12%). This keeps your composition visually balanced.
Step 5: Add Textures and Decorations to Your Full Page Doodle
By this point, you should have your fully outlined full-page doodle, and this stage may have taken hours!
You’ll notice that the text has the thickest outlines to make it the focal point of the composition. In addition, I’ve filled in some areas to create visual contrast and eliminate any hidden details.
However, besides the text and characters, there’s still room for making the artwork more engaging. Without additional elements, there might not be much for the viewer to explore. To address this, I introduced some playful additions. One of them is adding rosy cheeks to the characters, I decided to use pink for the cheeks to infuse a touch of life and charm. I also added white highlights to the characters’ eyes to make them stand out and sparkle.
I also incorporated textures and decorations. Remember the little elements you noted during your initial sketches? Now is the time to utilize them!

These elements include notes, accent marks, bursts, hearts, and dots. They transform a relatively plain drawing into a delightful explosion of fun and visual delight. It’s essential not to overcrowd your design with the same elements, so maintaining variety is key.
I placed these decorations to bring more character to the artwork. They add a sense of playfulness and depth to the composition. For instance, notes easily fit next to the boombox, and accent marks filled empty spaces.
The key is not to overdo it but to create a dynamic visual experience.
Finally, don’t forget to sign your artwork. It’s your personal touch, a signature of your creation.
Watch Next
If you enjoyed this tutorial, you will also love:
- How To Draw Kawaii Pun in Graffiti Style in Procreate – Step by Step Drawing Tutorial
- How to Make Gradients in Procreate: 3 Easy and Fast Ways!
- How to Draw Kawaii Faces
- How to Avoid Blurry Lines in Procreate: Step-By-Step Guide
Join Our Facebook Group
Join our safe and friendly community on Facebook to share your kawaii art, get feedback, and connect with like-minded creatives. Create, share, and celebrate cuteness together!
Share the Love
If you enjoyed this tutorial, share it with your friends using the buttons below. 👇 Let’s co-create together! ❤️