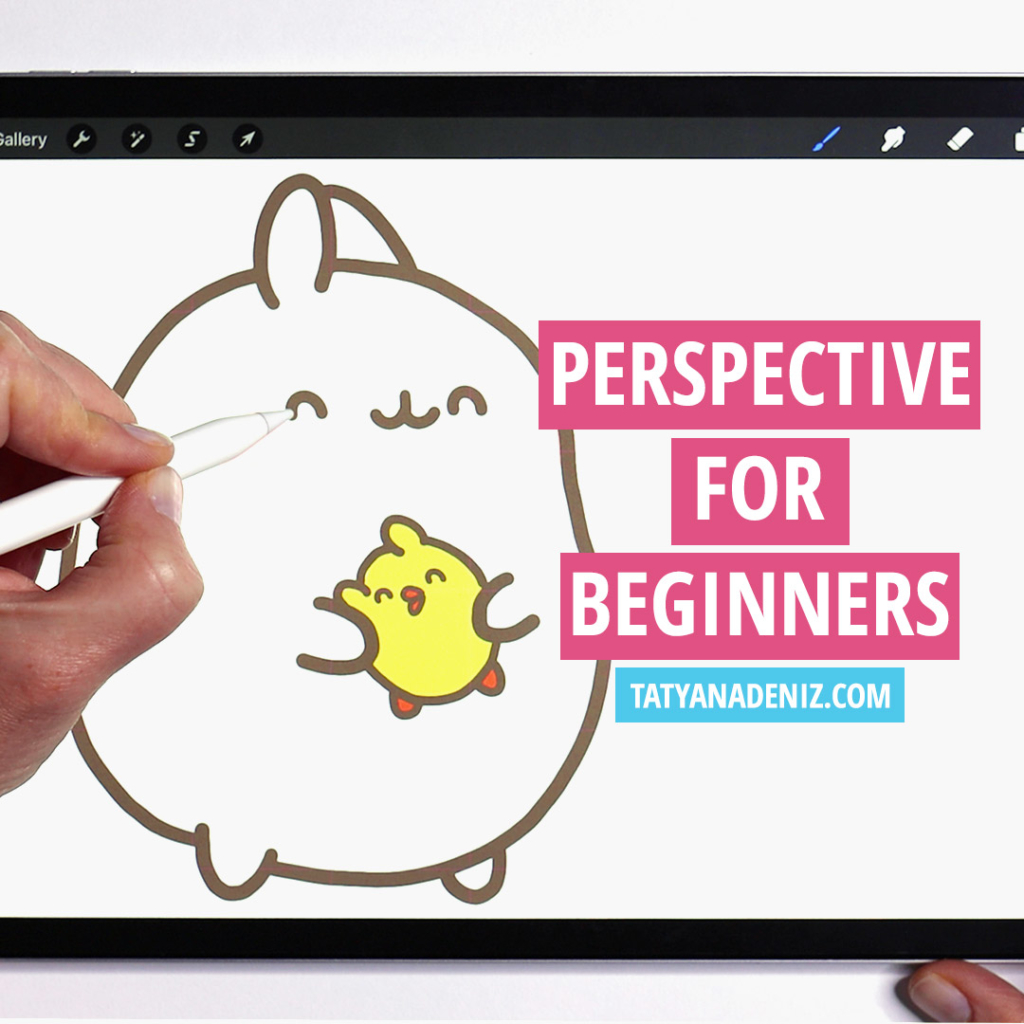
This post is part 2 of our “how to draw Molang” series. Today we will learn how to draw characters in perspective. Specifically, how to draw Molang in a three-quarter view, holding his friend Piu Piu. 🙂
Now, let’s face it, drawing characters in perspective is hard, am I right? But I have some tricks will make it easier. In this tutorial, I will show you these tricks.
The most important tip is to think of your character as a three-dimensional shape.
We’re drawing Molang and Piu Piu, and essentially, Molang is an egg-shaped character. If you can, imagine the shape of an egg and try to project it onto your page.
When we are drawing, I’ll demonstrate how to get your brain to understand the drawing as a three-dimensional shape by using guidelines.
For this demonstration on how to draw characters in perspective, I’ll be using Procreate. In Procreate, I’m using a Derwent sketching brush that feels a lot like sketching with a real pencil.
Complete Step-by-step Tutorial
👉 CLICK HERE to Pin This Tutorial 👈
👉 CLICK HERE to Pin This Tutorial 👈
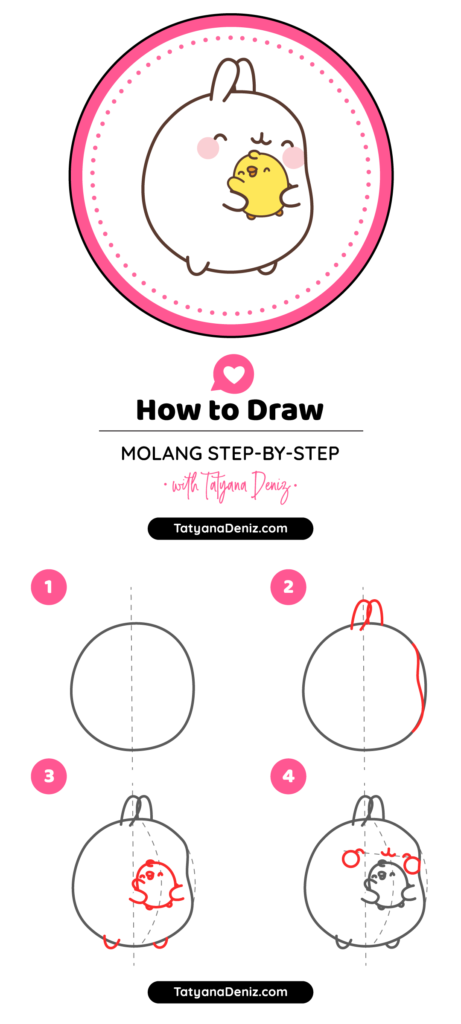
Step 1: Create the Foundation
The first thing I usually do is draw a vertical guide. Now, our character is going to be in perspective, so it’s not going to be flat on, but this guide, right now, is just going to help me put that first shape in place.
Last week, we saw that Molangs shape is oval, but more squished towards the top and flatter towards the bottom. I’m going to start by sketching out the shape, remembering that while the drawing appears flat, we need to imagine it as a three-dimensional egg that’s coming out of the page.
Imagine that this 3D oval is coming out of the page, and we are drawing a line along its surface. Once you’ve created this guideline, it will appear as if it is describing the egg shape.
What we saw in Part 1 of this series is that Molang has a pear shape. There are these dimples on each side that define where his head meets his body.
To create this shape in perspective, we’ll create a dimple on the right side (where Molang is turned).
We don’t need to do both sides, because of the perspective. Molang doesn’t have a dimple at the back, so we’re going to leave that line as it is.
Our guidelines also help us describe where the face is going to go. So, we’re going to do the same dimple on the guideline at the front to help us position the face.
Step 2: Create Features in Perspective
Ears
Let’s add some ears. The left ear is positioned slightly in front, and the second ear in the back, so they overlap.
We draw the front ear in front of the body’s line; then, the back ear draws behind the body’s line. By drawing the ears overlapping, we are creating that illusion of three-dimensionality. It’s like stacking forms. You have to think about it in your mind, the order of shapes, and then overlap the lines to express it visually.
Face
I’m going to make the same facial expression as Part 1 for this example. The difference here is that the face is turned, so there is a compression effect that happens.
Let me explain. 🙂
When we had the front view, the eyes were the same distance on the left and right. But now, the back eye is slightly closer to the mouth than the front eye. The nose repeats the position of the guide.
By creating more space between the left eye and the mouth, we give the face illusion of perspective. And now, let’s add the cheeks the same way we had them. But one of the cheeks is almost going to run off the page because it’s right on edge. So, all I did was shift everything to the right side, where the character is turning, to create perspective.
Feet
Using the same principles, we’re going to create the feet and hands. Remembering stacking forms, the front foot facing us will overlap with the body just a little bit. By overlapping, you will show that three-dimensionality.
And then the back foot, in contrast, is only going to peak out a little bit on the other side, but it does not overlap. By drawing the feet this way, you create the illusion that there’s a three-dimensional form in front of you.
The order should be: front foot, then the body, then the back foot.
Hands
For the hands, Molang is holding Piu Piu. And to make things fun, we’ll put Piu Piu in perspective. 🙂
Now, Piu Piu is a little chick, and… (surprise!) also looks like an egg shape.
If you remember, in Part 1 of this series, we described the hands as these little U-shapes that overlap with whatever the character is holding. When drawing characters in perspective, it’s the same thing.
A great way to imagine this is: Molang is holding an egg. To make the egg into Piu Piu, we’ll add legs and make him hug Molang back, saying, “Hi, I love you.” Then we’ll give him a face with a little beak.
Once you feel like the face is cute enough, let’s do the outline!
Final Touches: Outline and Color

Before we start adding color, let’s add another layer below our outline layer. I’m using pink color for the cheeks. Now, notice that I didn’t outline the cheeks because I didn’t want it to have that harsh brown outline.
Let’s draw Piu Piu in a nice yellow color that looks like a chicken. And let’s give Piu Piu some red feet, cheeks, and even a pink mouth.
What to Consider When Learning How to Draw Characters in Perspective
We did it! Now you know the basic principles of drawing characters in perspective.
Next time you are drawing a character, think of your character as a collection of simple shapes.
Think of the character’s head as a sphere. Then you can put the face and all of the features onto that sphere.
And the body is an egg-shape or pyramid (depending on your character).
This is the most effective tool if you want to learn how to draw characters in perspective. That’s actually how the artists work, and that’s how I learned it in art school.
If you missed Part 1 of this series, click here to learn how to draw Molang step-by-step.
Join Our Facebook Group
Join our safe and friendly community on Facebook to share your kawaii art, get feedback, and connect with like-minded creatives. Create, share, and celebrate cuteness together!
Share the Love
If you enjoyed this “Molang in perspective” tutorial, please share this post with your friends using the buttons below. You will make my day!
Thank you! See you in the next tutorial. 🙂